

When LinkedIn first launched in 2003, many people believed it was just a recruitment platform. A place where you upload your resume and land your next role. Things have certainly changed over the years, today LinkedIn generates more than 80% of all B2B leads generated online.
Whilst most businesses recognise the sheer power of LinkedIn… There are still plenty of businesses who are either new to the platform or have been a member but haven’t used it to its full extent. That’s why we’ve decided to go right back to the basics and put together a beginner’s guide to leveraging LinkedIn, and how to best manage it once it’s launched. So let’s get into it.
Account Settings
The first thing you need to do is create an account so you can become a member of the platform and establish your own profile. If you haven’t yet done this, just follow this link to sign up.
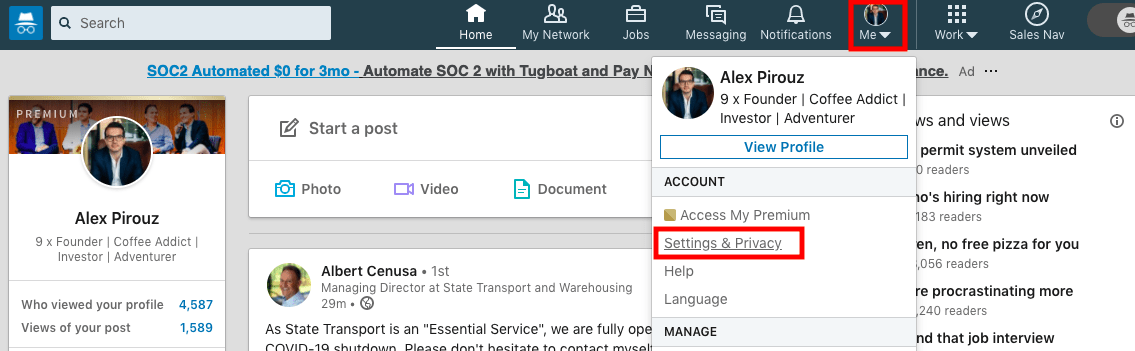
Once you have signed up you need to update your privacy and account settings which is an important step to take as it will affect your visibility on the platform. To do this on the LinkedIn homepage click on ‘Me’ in the upper-right section and then click ‘Settings & Privacy.’
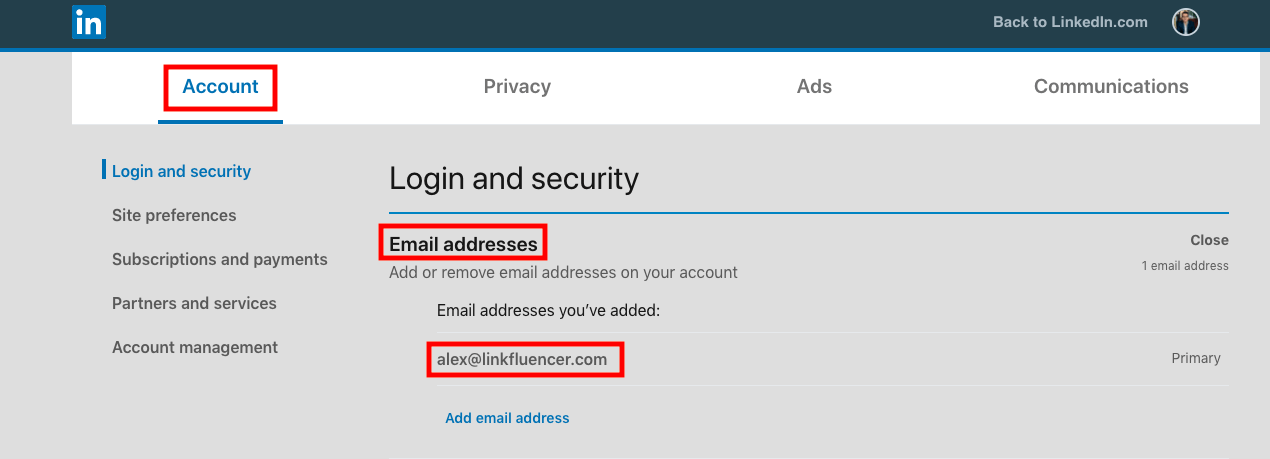
Go to the Account section first and click ‘Email addresses.’ Make sure your primary email is set to your business email address as this looks much more professional.
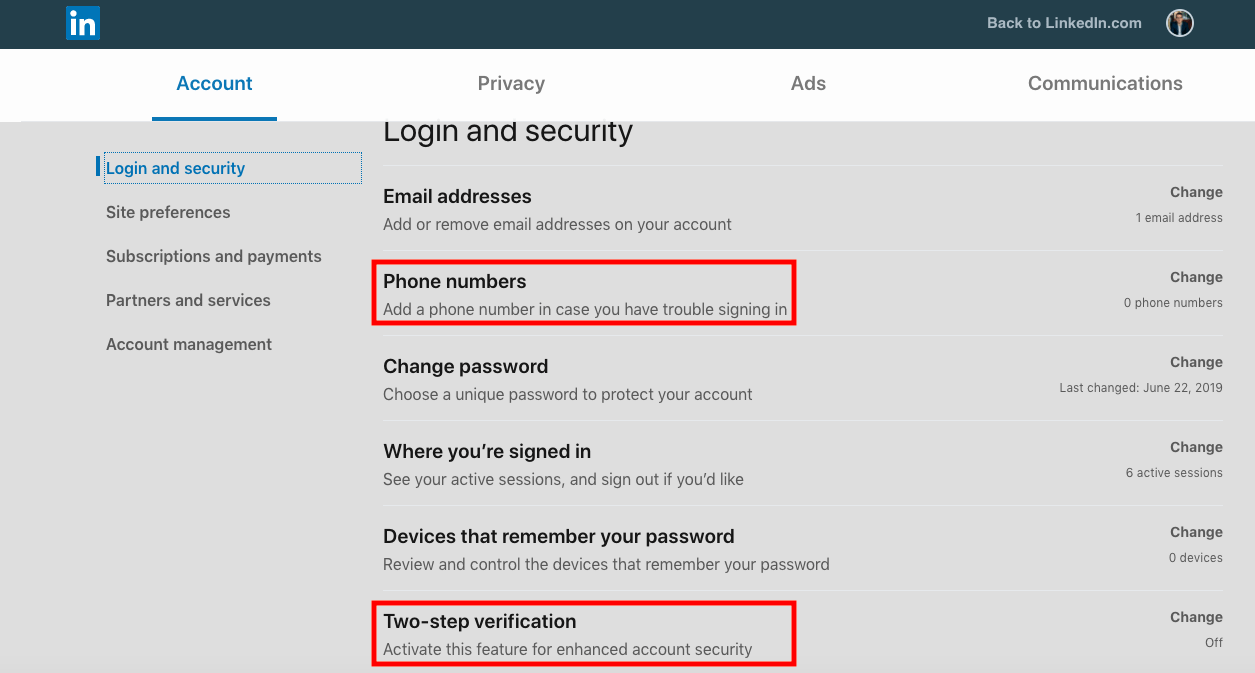
Other settings you may want to consider are phone numbers if you’d like to add this in, and two-step verification for extra security.
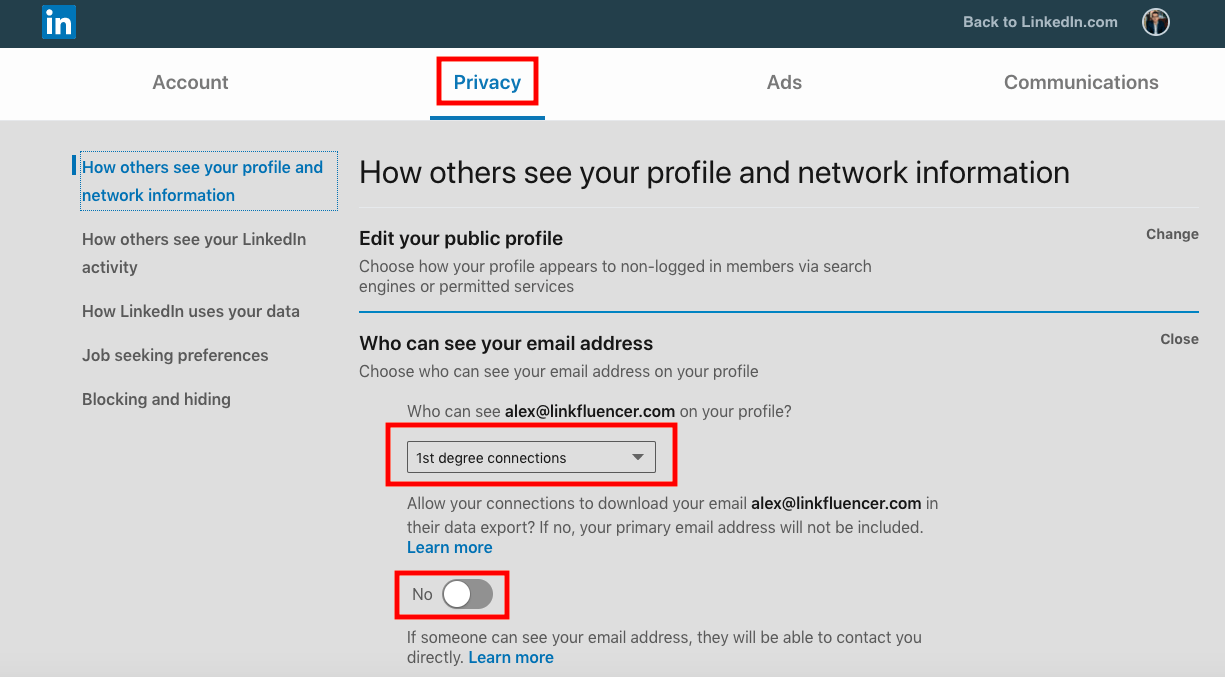
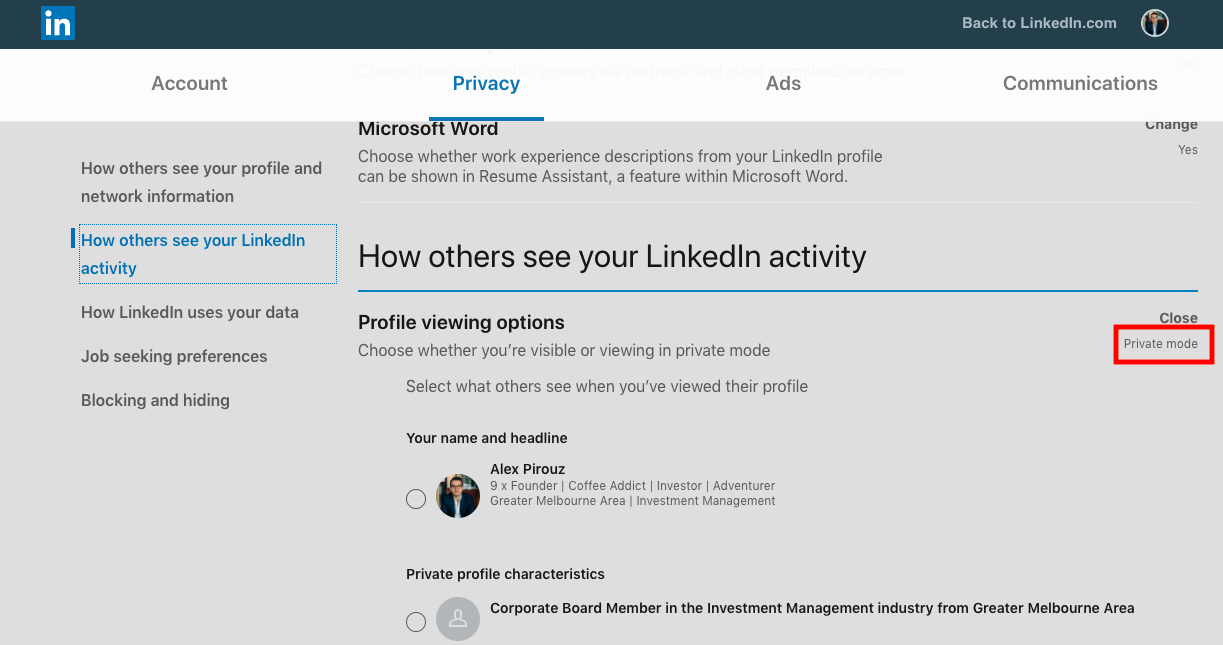
Privacy Settings
Next, you want to set up your Privacy settings. First click on ‘Who can see your email address,’ and then select ‘1st degree connections’ and ‘No’ for your email address to be downloaded if someone was to export their network data.
The reason why you want to just allow your 1st degree connections to be able to view your email address is because you don’t really want people outside of your network being able to email you personally. Especially if you don’t know who they are and you haven’t even screened their profile. You may not even want to connect with them.
Finally, click on ‘How others see your LinkedIn activity’ and set yourself to private mode. If you don’t do this step then anyone who you search on LinkedIn will see that you’ve been looking at their profile.
After you’ve completed setting these up, make sure to go through the rest of the settings under privacy and make any changes you wish. For example, if you update anything on your profile such as a new job title, this will come up as a status update automatically if you don’t alter your settings.
Introduction
Now that your account settings are all done, it’s time to update your LinkedIn profile. This is the MOST important part of this entire process as your profile is the cornerstone of your LinkedIn identity and will ultimately determine how people perceive you on the platform.
Starting from the very top, first you need to create some great imagery for your profile picture and header banner that will perfectly position you and your brand. What usually works best for the header banner is an image of you on stage, at an event, working with a client, or working with the team. You want this image to be personable yet professional.
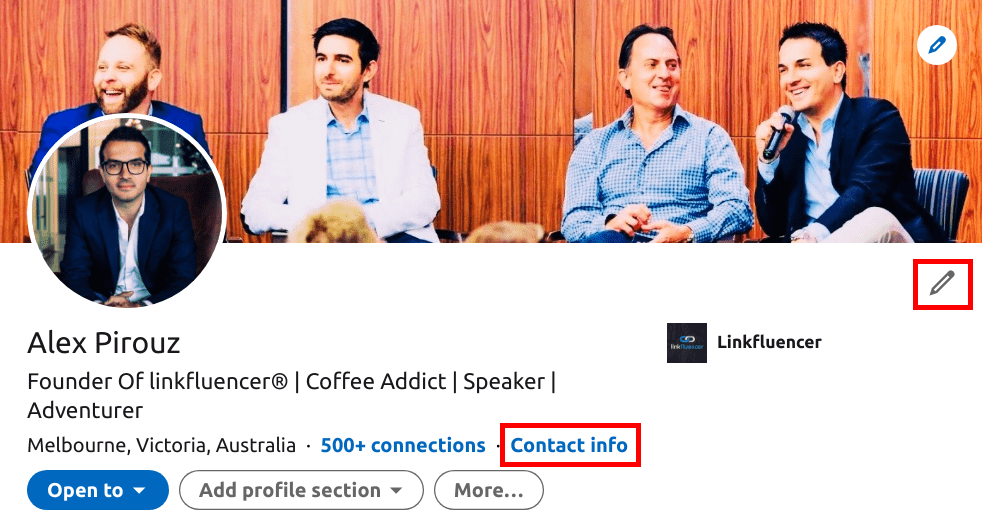
Once you’ve got your imagery sorted, the next few metrics you need to fill out are quite simple. This includes your title, location, industry, and contact details.
For everything besides your contact details, click on the pen editing icon in the image above next to the ‘More…’ section and proceed to fill this out. To complete your contact details, click on the ‘Contact info’ button highlighted in blue above.
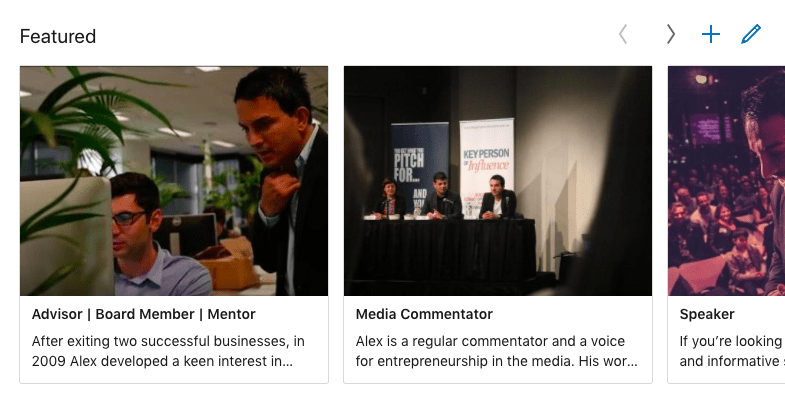
Featured Media Section
This is the section right underneath your introduction that is designed to display your best and greatest achievements. Here you can really showcase your career highlights.
Some good examples to include here are interviews, client testimonials, speaking engagements, awards, and your products and services. It’s a great way to build your credibility and position yourself as a thought leader in your particular industry.
Summary
Now that the basics are complete, it’s time to fill out your summary section which is the last area within the introduction section. If there’s one place that you need to get right it’s this, and you have 2500 characters to do it.
All the other areas we’ve covered so far give your prospect a glimpse of who you are and what you do. But ultimately it’s your summary that will drive your message home and truly connect with your target market, when written properly of course. It needs to be written in a story format and in 3rd person.
Your goal is to make it as compelling, engaging and emotional as possible. A good method to dive deep is to separate your life into specific age brackets such as 0-12, 13-19, 19-25, and so on.
Then from there collate the most relevant and important information to write up your summary. For guidance, you can also check out Alex’s profile as an example.
Work Experiences
For the work experiences section, you want to write up a short snippet about the company and your role at the time. A good structure to follow is to start by highlighting the mission of the company and then go into the products and services and any relevant information.
After this include any key achievements such as awards, publications, or companies the company has worked with. Then finish off with what your role was and your main responsibilities and achievements.
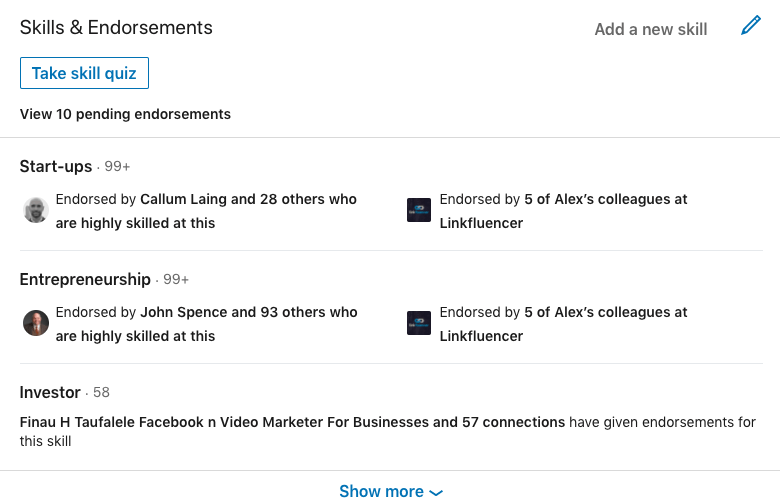
Skills & Endorsements and Interests
Your skills section is where you want to showcase the areas you have the most expertise in. It’s important these are consistent with the products and services you offer as well.
Your outcome in this section is to come across as a specialist, not a generalist. A generalist is someone who has 10, 20, 30+ endorsements listed on their profile with most of them not even related to their industry. A specialist is someone who lists 3-5 key skills that are targeted and relevant to their personal brand and target market. In the text box below go ahead and list these.
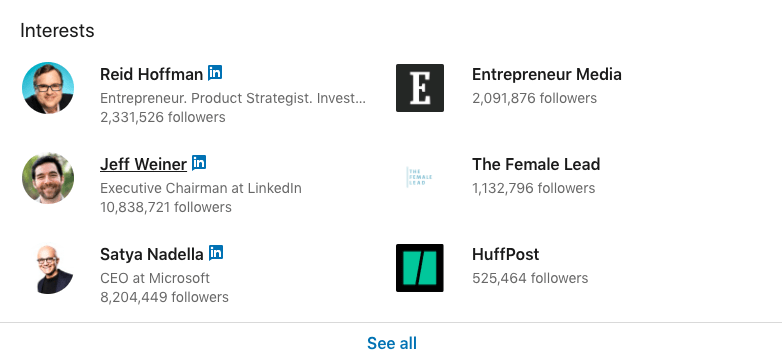
This brings us to the final section of your profile, your interests. The purpose of this section is to showcase some of your professional interests that are relevant to your personal brand and target market. We recommend the following companies, influencers, industry bodies, and media publications that are credible in your industry and that your target market will resonate with.
Now that your LinkedIn profile is finalised, it’s time to get all the resources ready you’ll need to launch your very own campaign.
Target Market
The first thing you need to do is get clear on your target market. Start to think about the position, industry, location, company size and seniority level of the people you want to connect with. So for example, if your target market is Builders in Melbourne who own their own construction company, your client avatar might look like this:
Title: Owner, Founder, Co-Founder, Managing Director, CEO
Industry: Construction
Location: Melbourne, Australia
Company Size: All sizes
Seniority Level: Owner, CXO, Partner, Director
Once you know your audience, then have a look at your overall sales process to understand where your LinkedIn campaign fits in. For example you may want to open up conversations to book in more phone calls, or have more virtual site meetings.
Now that you’ve got all the data, it’s time to put a plan in place to get in front of this audience. To do that you need to sign up to Sales Navigator. This is a premium feature that allows you to drill down from the millions of users to a specific audience you want to find, connect, and start building relationships with. To learn more about how to probably leverage this feature, follow this link to request a free demo.
Scripts
For your campaign you will need to create two scripts, one is your connection invitation script and the other is your private message script.
The connection invitation is the first initial message that will be sent to your target audience along with the connection request. The key with this first message is to open up a conversation. You want to avoid coming across pushy or salesly as this will not yield many responses. An example of this is:
Hi John, I thought I’d reach out with an invite to connect as I do a lot of work with other executives in the construction industry across Melbourne. Cheers, Mark.
The private message script is sent to anyone who hasn’t responded to this initial message above. Send this message the next week on a Tuesday or Wednesday as we’ve found these days have the best response rate. Here is an example of a good script to use:
Great to connect (name), would be good to chat sometime to learn more about you and your business.
Let me know how you’re placed over the next few weeks.
Now that you’ve got your target market sorted and your scripts ready to go, it’s time to move onto the final and most important phase, execution.

Now that you’ve got all the resources ready for your campaign, it’s time to create a plan and stick to it. To hold yourself accountable, create a weekly structure that works for you. To do this, you may set aside 1 hour every weekday between 3pm – 4pm to send your invites and a window of 8am – 8:15am to respond back to any messages you need to.
If you’ve decided to send your private messages every Tuesday, you may set aside 11am – 12pm for this. Remember, no matter how great your profile is or how engaging your messaging scripts are, it’s all about showing up everyday, being consistent, and being committed to the process.

Over the years, LinkedIn has grown to be the most popular and powerful business networking site online. Millions of business owners are turning to...
There has been a lot of exciting changes on the platform over the past 12 months, but none more exciting than the introduction of Live...

Still early days, but I've done just over
$50,000.

We're celebrating the launch of Jayla by giving our first 500 customers access to our VIC club. As a 'Very Important Customer' you won't just feel special, you'll get notified of the release first and have the price of your subscription fixed for life.
On top of all that you'll get priority support and an invite to an exclusive live masterclass with our founder Alex Pirouz. This is strictly limited to only 500 VIC's available.
We’re celebrating the launch of Jayla by giving our first 500 customers access to our VIC club. As a ‘Very Important Customer’ you get access to Jayla weeks before the public, price of your subscription fixed for life, priority support and an exclusive live masterclass.
Fill out your name and email to be in the know.
